Do you know how to organize your photos on Google Photos? The process is very easy to do, as you will see throughout the article. And it couldn't be any different, since this cloud storage service is one of the most popular out there!
Cloud storage makes it much easier to save and manage your files. And you can do it from anywhere, all you need is an account. Other examples include Amazon Photos and iCloud, also known as Apple Photos.
How to organize your images in Google Photos?
Google Photos is a free app with a decent amount of storage. If you need more storage, then you will need to upgrade to a premium subscription to increase the capacity. But to get started, simply create a Google account and download the Google Photos app from the Google Play Store. Play Store or in App Store.
You can set up automatic backups for Google Photos to sync everything as soon as you take a photo. Or, you can manually select what you want to upload. You can access these images on any device as long as you sign in to your Google account. You can also back up your Google Photos to your hard drive or phone.
The service is quite simple and you can create organizing folders. Below we will show you how to use and organize your images on the Google platform.
Automatically send photos (or stop doing so)
The first thing you should do to organize your app is to enable (or disable) Google Photos backup and sync. Many people like to have all their files automatically sent to Google servers, and this can be very helpful. Especially to protect you from data and file loss.
However, there are two things to keep in mind. The first is that storage is limited to just 15GB, shared with all other Google products. That is, unless you subscribe to Google One.
The second is that by uploading everything automatically, you can quickly lose track of what’s there. If you like to take multiple photos and then choose one to use later, this can be a problem. After all, they’re all in the cloud!
Hence the whole process of cleaning your storage becomes more difficult and complicated.
Delete unnecessary photos
As mentioned, storage is quite limited in the Google Photos app. If you’re close to the limit, it may be time to delete anything that doesn’t need to be there. For example, screenshots and videos, and photos from your WhatsApp groups.
It's very easy to delete, and you just need to select the desired image (or several) and then click the delete button. Delete, identified by a trash can. So the files you selected went to the trash!
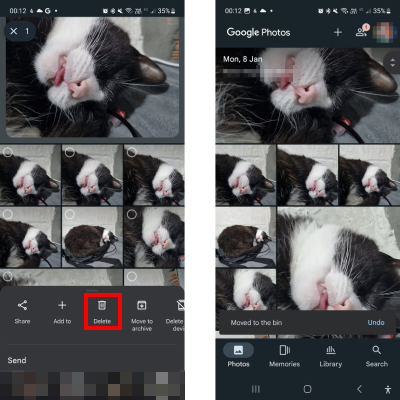 Image: Google Photos
Unfortunately, one tool that the platform doesn't have is the ability to select all the photos in Google Photos at once. But at least you can select all of them from each month.
And restore the ones you didn't want to delete
But when you send items to the trash, they aren’t deleted right away. In fact, you can restore any file up to 30 days after it’s been deleted. And it’s really easy to do:
- 1. Go to Library at the bottom of the screen;
- 2. Tap on Bin near the top;
- 3. Then just select what you want to restore and tap the restore button. Restore to complete.
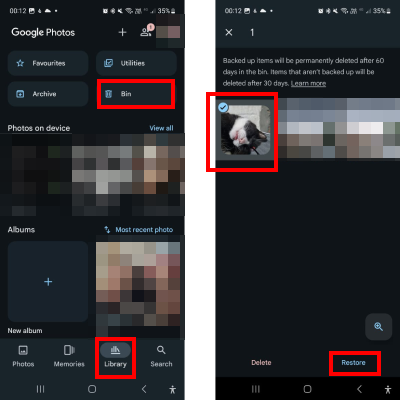 Image: Google Photos
Group photos automatically
Google Photos is full of AI tools to help you. Among them is the clustering feature that can analyze the visual content of all images to group similar things together. This way, you can search for a person and see all of their photos, for example. It also groups documents and screenshots, among other things.
People grouping may not be active for you. So check here how to enable this feature:
- 1. After opening the app, tap on your profile icon in the top right corner;
- 2. Then tap on Photos settings and then in Preferences;
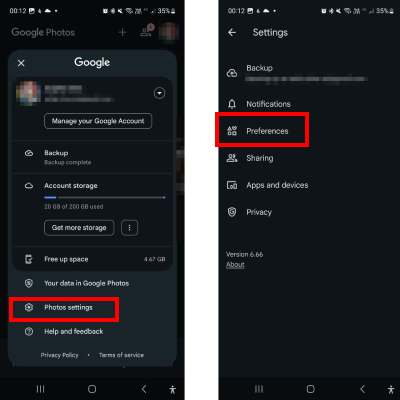 Image: Google Photos
- 3. Now, go to the option Group similar faces and activate the Face groups.
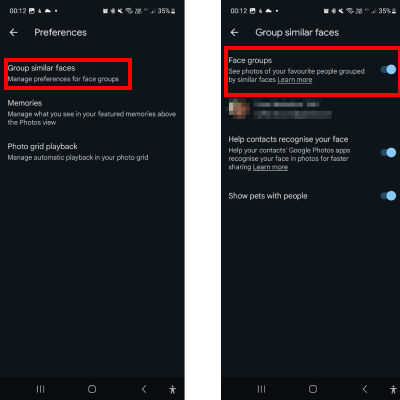 Image: Google Photos
Create albums
Another great idea for organizing your Google Photos is to create albums for your images. This may seem like a lot of work. But there’s a really interesting tool in Google Photos that lets you automate this, at least in part!
- 1. Tap on the icon + at the top of the screen;
- 2. Now, tap on Album to proceed;
- 3. Tap on Select people and pets;
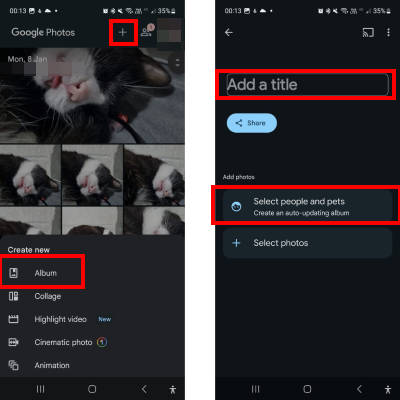 Image: Google Photos
- 4. On the next screen, you can select who you want to be added to your album. And the best part is that it will always update with new photos;
- 5. Then, choose a name and… that’s it!
Read also: Organize your life with task reminder apps
Now, if what you want is to create really well-organized photo albums, and not just based on who is in the photo, the process is manual. Still, you can take advantage of the grouping that the tool does and then remove the photos you don't want from the album, for example.
Have you managed to learn everything about Google Photos?
Using these apps doesn't have to be rocket science. Pay attention to the tutorial and put it into practice, and you'll have your photo albums super organized and you'll never lose your files again.
Gone are the days of using physical photo albums. Those days are long gone and have been replaced by virtual and, more recently, cloud-based systems. And of course, you can download images from Google Photos to access locally!
Despite the nostalgia, the practicality of having everything available virtually today is incredible and we can no longer think of living any other way.

